Advanced software is addressing modern manufacturing challenges, ensuring unparalleled precision in an era of zero defects.

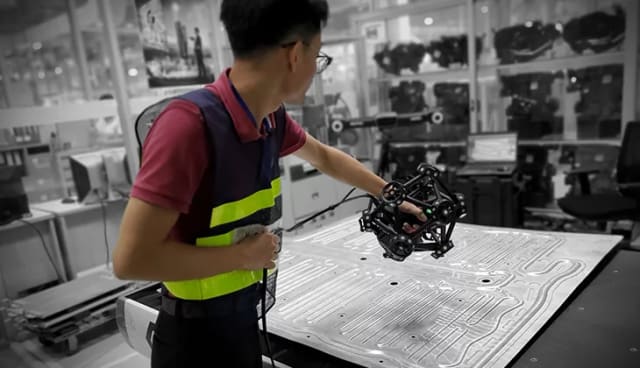
VXinspect enables you to validate the quality of manufactured parts and generate reports based on thorough engineering requirements. (Image: Creaform.)
As the manufacturing world pushes towards the goal of zero-defect production, part inspection is critical. Sheet metal’s thinness, coupled with its susceptibility to warping, demands precision inspection—even the most minor deviations have significant implications down the line. This underscores the need for exhaustive and precise quality control reports.
Sheet metal components have certainly evolved along with other technological advances in manufacturing to handle complex and intricate parts that traditional inspection methods now struggle to measure. The pursuit of zero-defect perfection has driven the development of quality control methods with cutting-edge technology that makes use of the vast amount of available data to navigate complex designs, quickly becoming the standard in the manufacturing world.
Addressing Sheet Metal Inspection challenges with Advanced Software
VXinspect is a dimensional inspection software that enables quality control and quality assurance professionals to perform inspections and generate reports.
During a recent webinar, David Robichaud, Technical Product Manager at Creaform, delved into the challenges of quality inspection. He highlighted how the latest inspection software is tailored to address these specific challenges, especially for sheet metal components. Integrated with 3D scanning technology, the software delivers a depth of data unmatched by traditional methods. This allows engineers to identify even the slightest deviations, which is crucial for sheet metal components where minor inaccuracies result in significant functional or structural issues.
“One benefit of VXinspect is the automatic creation of a constraining plane for 2D entities such as circles. VXinspect offers various measurement methods depending on the entity we’re creating and the type of data we have,” says Robichaud. “Since this is a sheet metal part with minimal thickness, the best approach to extracting circles is using the edge measurement method. This method automatically filters out points from the constraining plane of the circles and combines the inner wall with the boundary. This method ensures the hole is precisely measured.”
He also demonstrated the alignment capabilities of VXinspect using a CAD model and scan data of a sheet metal component. Proper alignment, such as the surface best fit method, is more than just a step in the process—it’s foundational. Ensuring accurate alignment from the outset means potential issues are detected and addressed early, preventing costly corrections later.
Engineers can’t just design a product and throw it over the wall for someone to manufacture. They need to convey design intent clearly to ensure products meet stringent industry standards. Advanced software solutions offer features like GD&T callouts, which are essential for this communication. Why are these callouts so vital? They provide a standardized way to communicate measurements and tolerances, ensuring that everyone, from design to manufacturing to quality control, is on the same page. VXinspect’s ability to integrate data with GD&T callout options means that quality control reports are not only detailed but also standardized, reducing the potential for miscommunication or errors.
The webinar shed light on how software, like the one from Creaform, is stepping up to tackle the intricate geometries of sheet metal. Let’s face it, if you get the inspection wrong with these complex shapes, you’re looking at potential product failures. But with advanced software, every curve and every angle is meticulously measured and analyzed, ensuring nothing slips through the cracks.
Now, the real game-changer here is the evolution of quality control software. Imagine having 3D inspection software so precise that it guarantees 100 percent accuracy. That’s not just a nice-to-have; it’s becoming a must-have in sectors that won’t settle for anything less than perfection. And the best part? These inspection tools aren’t just about accuracy. They’re about making the life of a quality engineer easier. By merging 3D scan data with top-tier inspection software, the time it takes to inspect a part drops dramatically, boosting overall efficiency.
But here’s the thing: as advanced manufacturing keeps pushing the boundaries, traditional quality control methods are struggling to keep up. The industry’s rapid tech evolution means we need fresh, innovative solutions. That’s where tools like VXinspect shine, effortlessly tackling the challenges of growing complexity.
And speaking of tools, let’s not forget others in the arena. Another standout is Oqton’s Geomagic Control X. This reverse-engineering software zeroes in on detailed measurements and data accuracy, ensuring every part is up to snuff.
Oqton’s Geomagic Control X delivers tools emphasizing detailed measurements and data accuracy. The software boasts a user-friendly interface adaptable across industries. Its automation features target human error reduction, especially vital for intricate sheet metal components. With features like automatic alignment tailored for sectors like aerospace and pipeline, its prowess in pinpointing minute deviations in sheet metal components stands out.
Innovmetric’s PolyWorks Inspector stands out for its measurement capabilities and collaborative emphasis. As a universal platform, the software enhances process efficiency and team collaboration. Its standout feature is the collaborative tools, enabling seamless digital sharing and team communication, ensuring real-time feedback from the production floor.
Choosing software platforms isn’t only about features. The right software bolsters product reliability, and opens the door to substantial cost savings by reducing the likelihood of recalls, minimizing waste and optimizing inspection and production efficiency.
The Future of Quality Control and Inspection
AI and machine learning are revolutionizing sheet metal inspection. Instead of just spotting defects, they’re now predicting and heading off issues before they happen. Using past data, these tools are shifting from just fixing problems to actively maintaining quality.
While traditional inspection methods have their merits, they also come with inherent limitations, especially when human error is factored in. The future of the industry is looking towards machine learning algorithms, which, when trained on extensive datasets, detects even the most subtle defects. This ensures sheet metal components meet the escalating quality standards essential for staying competitive in an ever-evolving industry. As these algorithms evolve and mature, expect sharper accuracy in defect detection.
Advanced 3D scanning technologies and software solutions are driving a paradigm shift in the quality inspection industry. As these tools keep improving, manufacturers aiming for zero-defect manufacturing rely on them for unmatched precision, efficiency and in-depth quality control reporting.


