Using GD&T's precise communication drives efficiency, minimizes errors and makes elegant designs more manufacturable.

There’s often a need to balance innovation with the practical concerns of design for manufacturability (DfM). DfM helps foster cost-effective designs and efficient production, but it can also result in overly utilitarian final products as opposed to inspired ones. geometric dimensioning and tolerancing (GD&T) is one way to bridge the gap between truly unique design and practical manufacturing realities.
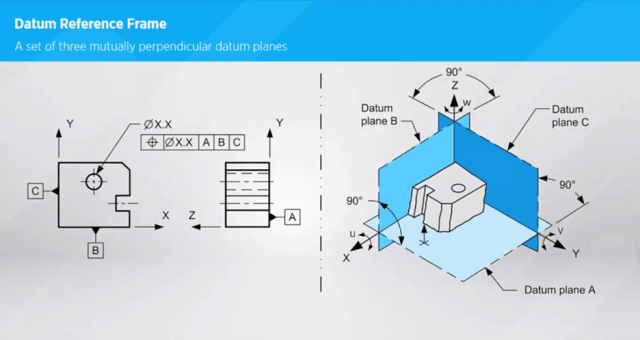
GD&T is a standardized system (or even a language) used to define and communicate engineering tolerances, particularly helpful in mechanical engineering and design fields. The system provides clarity on how the features of a given part relate to other part features in such a way as to create a functional finished product through symbolic descriptions identifying specifications like size, form, orientation and locations of features on a part.
By using GD&T, engineers ensure their parts are produced consistently and within tolerances, reducing scrap and rework and avoiding discovery of nonviable designs late in the process. It also provides flexibility in manufacturing because certain features could be given more tolerance if doing so doesn’t negatively effect overall design integrity.
According to Curt Pawloski, GD&T master practitioner and SAE International constant trainer, GD&T can also contribute to quality, efficiency and cost savings. He said that GD&T does a much better job of defining a customer’s or engineer’s requirements, specifically assuring that parts and products address “functional” requirements.
“We live in a three-dimensional world, GD&T coupled with 3D modeling is best suited to meet three-dimensional needs where the old methods of dimensioning and tolerancing described things in two dimensions,” Pawloski said.
Michigan Manufacturing Technology Center Quality Program Manager Bob Jenkins similarly said that GD&T has improved dramatically due to current computer modeling, 3D design and software capabilities.
Pawloski also said that inspection efforts that focus on GD&T requirements verify that the part, subassembly and product will meet functional requirements. In the past, inspection efforts might have just gathered meaningless numbers in some cases. Design technology has advanced alongside advances in inspection equipment technology to allow inspection to verify and assure functionality.
“There are methods available to address the unique requirements of the simplest to the most intricate parts that did not exist in the past,” said Pawloski. “The wide array of methods to describe unique requirements is mind boggling. When thinking of aesthetics one consideration is the unique shaped surfaces required by modern products.”
Applications of the GD&T profile tolerance provides a way to describe the size, location, orientation, and form of the most complex to the simplest unique surfaces. Identification of logical datums based on function, together with the ability to identify and better control geometric characteristics, often provide better results.
GD&T provides a standard language for designers to precisely convey their intentions, minimizing misinterpretations and ensuring consistent manufacturing. The inclusion of GD&T in the next version of the IATF 16949 standard, alongside DFM and DFA, will be vital for sustained excellence in manufacturing, Jenkins explained, because it will increase awareness and adoption of GD&T among engineers.
Cost savings and efficiency are related on the GD&T benefits front. Often, parts are unnecessarily discarded due to inaccurate specifications, leading to waste and increased costs. With GD&T, the efficiency of the manufacturing process is optimized, as it offers a clearer perspective about which parts meet the criteria and which do not.
“We’re scrapping out good parts because of the wrong spec. From a money point of view, efficiency goes up when you have the opportunity to declare a part that is good,” Jenkins said.
Elegant Design is Back on the Menu
GD&T is not only beneficial from cost and efficiency standpoints, but also offers more flexibility to engineers.
Jenkins suggested that while precision is important, GD&T gives engineers the leeway to design with a broader range of acceptable tolerances, ensuring that designs are both efficient and cost-effective.
“By focusing on function, GD&T can reduce costs,” said Pawloski. “One major function that a part must meet is ease of assembly. Concepts such as concentrating on worst case scenarios for mating with other parts and the ‘bonus tolerance’ provide the largest realistic tolerances while still assuring ease of assembly. Flexibility is a key word to describe the use of GD&T and often this flexibility results in larger tolerances for manufacturing.”
GD&T serves as a bridge between design and manufacturing, translating design intentions into a format understandable for production. It allows designers to detail exact requirements without restricting manufacturing flexibility, promoting both elegance and adaptability. GD&T’s universal language reduces misinterpretations between designers and manufacturers, ensuring the final product mirrors the initial vision. Additionally, by anticipating potential production errors, it fine-tunes designs to enhance manufacturability without compromising aesthetics. In this sense, GD&T isn’t just a tool, it mediates between design aspirations and manufacturing realities, marrying innovation and practicality.
According Jenkins, GD&T also plays a role in enhancing the goal of achieving zero defects in manufacturing.
Industry standards mandate that DfM and DfA (design for assembly) engineers enhance designs to result in reduced failures. The mandate entails regular audits and evaluations that have augmented manufacturing quality and efficiency levels. The requirements, combined with DfA techniques, have reduced the frequency of errors, allowing designers to focus more on other aspects of the process. Yet it’s the integration of GD&T into the process that has made zero defects a reality, said Jenkins.
Yet mere adoption isn’t the only requirement to obtaining the full benefits of GD&T. The system entails a learning curve for engineers who lack experience using it.
“There are about 20,000 different parts on an individual vehicle and you’ve got a bunch of different engineers working on it,” said Jenkins. “If some don’t understand the implications of how GD&T can help manufacturing, they won’t be able to place it so they see more success.”

Jenkins stressed that there’s the risk of GD&T being implemented poorly. If an engineer is having trouble understanding a particular GD&T specification on a drawing or design, it might be because GD&T symbols or annotations were not used or written correctly. This is crucial because inaccurate or unclear GD&T can lead to manufacturing errors or parts that don’t fit together as intended, which defeats the purpose of the system.
Errors in GD&T annotations can create confusion. A correctly communicated GD&T ensures that everyone involved understands the specifications and tolerances of a part. Jenkins said that less skilled engineers can benefit from further GD&T training to prevent costly manufacturing mistakes.
For Pawloski, the silver lining of the Covid-19 pandemic was greater access to virtual training opportunities to help cut the risk of confusion around GD&T adoption.
“A GD&T subject matter expert can sit in one corner of the world and train students across the globe,” Pawloski said. “Similarly, GD&T SMEs can offer help on proper applications of GD&T to those across the globe as well. E-learning programs and virtual pdf versions of textbooks allow students to learn at their own pace. There is still a need for in-person, instructor-led training as spontaneous in-person communication forges a bond which enhances learning. Training delivery methods exist to meet every need.”


